Removing X10 Tank Cover
Last Modified: 1 January 2015
H
OW TO REMOVE the tank cover, described in service manual as 'lower cover'.
I had to do this to get access to and repair the alarm's seat opening security switch (a Datatool alarm, nothing to do with Piaggio).
For the following, 'tabs' refers to the plastic tabs that have spring clips over the end, and which snap into rectangular holes in an opposing panel.

WARNING: these can be very tight and difficult to pull out, especially where the spring clip has gone very rusty, causing it to jam in the rectangular hole. I have broken a couple of tabs off because of this, or if I'm luckier the spring has pulled off the end. If the spring was too rusty or bent to reuse I just threw it in the bin. There are more missing tabs too, so somone else has obviously been here before me!
IMPORTANT: generously grease all the springs before reassembly, to weatherproof them and make them easier to remove for the next time.

You will need to remove the seat. This is because the hinge mounts go through the back end of the cover. There are two short M6 bolts with 8mm heads fixing the support arm bracket (called in the manual 'piston'), and a further two longer bolts anchoring the seat hinge.

Remove the support bracket bolts first ~ then the hinge bolts ~ you may want a second person to assist!

NB: albeit I'm using a power driver here, which is invaluable for speeding up an otherwise very awkward and time consuming process by spanner alone (supporting the seat in the air for the duration!), the bolts need to be loosened with a ring spanner first. Ditto for tightening after reassembly.

Hinge base has like tubes that drop into recesses in the frame. The moulding of the centre plastic cover...

... follows this shape. Rescue two washers from the bottom of the fixing bolt tunnels...

Remove the central T30 bolt...

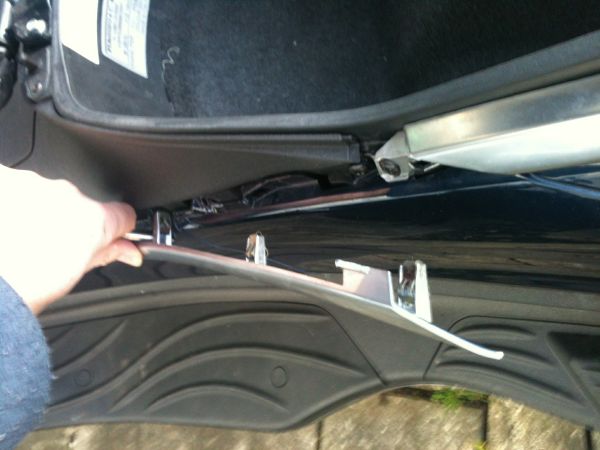
Carefully prise off both left and right middle section silver trim strips ~ they are only held on by tabs...
Remove all screws securing the top edges of the side panels to the tank cover...


Pop the fuel filler flap and remove these two screws...

Unscrew filler cap and remove the 'rubber drip tray' thingy ~ note I should have blocked filler hole with rag in case any water got in!

Still with the cap off, you can pull up the cover from the rear, but will need some persuading to free it from the side panels at the front, but not impossible, just needs a bit of care.

This is what you get access to:


LUGGAGE COMPARTMENT LAMP
After reassembling, I then got sidetracked with this ~ to remove the lamp, simply lever it out with a flat blade screwdriver as it just clips into the rear wall.
I found mine was very cruddy and in imminent danger of ceasing to work, because ~ yes you guessed it ~ of spray thrown up from the rear tyre.

I unplugged it, and sprayed everything with switch cleaner. I removed the bulb and scraped the bulb-holder contacts until shiny, ditto the two spades of the 2-pin connector. Smeared some Vaseline over the exposed metal conductors, tightened the 2-pin female connectors, a mild squirt of WD40, then I wrapped a small square of polythene (cut from a freezer bag) around the rear as shown below ~ this is held in place by the actual unit itself once it's snapped back into its rectangular hole.
